
Semi-naked cakes: An absolute must try
I had immense fun putting this cake together and I guarantee so will you.
I can recall how immense the hype for naked and semi-naked cakes was around the same time last year. I failed to understand why anyone would prefer to eat cake with a portion of the frosting missing, it simply bewildered me. However, once photographs of dainty caked draped in flowers and drizzled with all forms of wonderful sauces started flooding social mediums, I finally caved in.
If it weren’t for my family friend’s son’s first birthday and her request to bake a semi-naked cake to go with the fauna and khaki theme, then this cake would not be before your eyes on your computer screens. I had immense fun putting this cake together and I guarantee so will you.
 If it weren’t for my family friend’s son’s first birthday and her request to bake a semi-naked cake to go with the fauna and khaki theme, then this cake would not be before your eyes on your computer screens. Photo: Mahrukh Hamayun
Red Velvet Cake
Ingredients
All purpose flour – 4 cups
Baking soda – 2 tsp
Baking powder – 2 tsp
Salt – 2 tsp
Unsweetened cocoa powder – 4 tbs
Sugar – 4 cups
Vegetable oil or canola – 2 cups
Eggs – 4
Buttermilk – 2 cup
Vanilla extract – 4 tsp
Red food colouring – 2-4 oz. (depends how deep you want the colour)
White distilled vinegar – 2 tsp
Prepared plain hot coffee – 1 cup
Instructions
1. Preheat oven to 160 degrees Celsius on a fan forced oven.
2. In a medium bowl, whisk together flour, baking soda, baking powder, cocoa powder and salt. Set aside.
3. In a large bowl, combine the sugar and vegetable oil.
4. Mix in the eggs, buttermilk, vanilla and red food colouring until combined.
5. Stir in the coffee and white vinegar.
6. Combine the wet ingredients with the dry ingredients, just a little at a time, mixing after each addition, until they combine.
7. Generously grease and flour two round 9 inch cake pans with shortening and flour.
8. Pour the batter evenly into each pan.
9. Bake in the middle rack for around 30-40 minutes or until a toothpick inserted in the centre comes out clean. Do not over bake because the cake will continue to cook as it cools.
10. Let the pans cool down on a cooling rack until they are warm to touch.
11. Slide a knife or offset spatula around the inside of the pans to loosen the cake from the pan.
12. Remove the cakes from the pan and let them cool for a couple of hours. Before proceeding to frost your cakes with buttercream, wrap them firmly with several layers of cling wrap and place them in the freezer for 20 minutes to ensure they are the ideal temperature to be frosted.
Vanilla Bean Buttercream Frosting
 I failed to understand why anyone would prefer to eat cake with a portion of the frosting missing, it simply bewildered me. Photo: Mahrukh Hamayun
Ingredients
Salted butter – 500 grams
Sifted icing sugar – 4 cups
Vanilla bean paste – 4 tsp
OR
Vanilla essence – 6tsp
Instructions
1. Whip the butter on high speed for about 10-15 minutes. This will cause the buttercream to double in size and turn white in colour. This is how you will know you are ready to add the icing sugar to your butter.
2. Proceed to adding sifted icing sugar cup by cup and then finish by adding vanilla bean paste or vanilla essence to the mixture. The end result should be a fluffy white cloud of vanilla bean buttercream.
Method
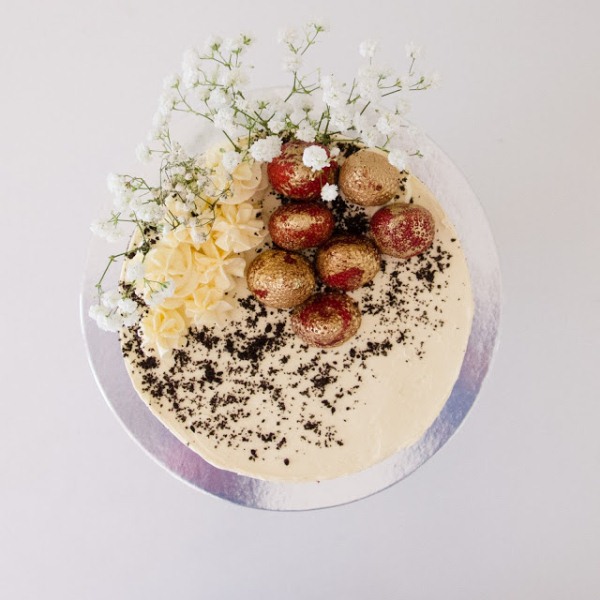 I had immense fun putting this cake together and I guarantee so will you.Photo: Mahrukh Hamayun
1. Cut each cake into two separate halves, ensuring they are of the same size. Use a cake wire cutter for more precision.
2. Place a dollop of buttercream frosting on your cake board to ensure the cake does not move after assembling.
3. Place your first cake layer on the board and cover it with sufficient buttercream frosting. For this step I prefer to pipe the cream onto the cake layer and then smooth it out with my long cake spatula to ensure an equivalent amount is piped onto each layer.
3. Repeat this step for the remaining cake layers.
4. Using your spatula, place odd amounts of buttercream around your cake, ensuring that you’re not covering the entire cake. Then, using your cake scraper, proceed to run it around the cake to remove excess buttercream.
5. Decorate your cake as you desire. I decorated mine with baby breath flowers, crushed Oreos and edible gold painted strawberries.
6. Proceed to place in the fridge for 1-2 hours until the buttercream has set.
7. Take your cake out from the fridge 30 minutes prior to serving.
This post originally appeared here.

More by this writer


COMMENTS (2)
Comments are moderated and generally will be posted if they are on-topic and not abusive.
For more information, please see our Comments FAQ